Friday 28 October 2016

3 Week project final update

I'm calling the 3 week project finished now. I have now added a start menu, level select and a bunch of other minor changes so I can make the game into a fully working packaged demo level. As I said in previous posts I'm really happy with the end result of this project and I'm not sure what I would have done different, I guess I could have tried out different types of bosses, but I decided to focus on one style of boss and improve upon that. 

Overall the game is really fun and I think I have sorted out all the problems that occur when it plays at a low framerate. Also turns out the game (played on my pc) goes from 100 fps in editor to 160+ when its a standalone executable so the game isn't anywhere near as demanding as it looks in editor, which is a relief.

I'm going to get some final play testing in on this version on Friday so see what people think about the nerfs to enemies and the design of the menus.

Here's some images of how the menus look.


Thursday 27 October 2016

Prototype Video P1

I took the game in for testing again on Wednesday and players found a few minor bugs with the character movement not registering properly on occasion. This has now been fixed, it was caused by the characters physics updating too slowly on machines running less than 60fps. The physics updating now happens 3 times as often so it should stop that problem.

Next it was really difficult (Which is what I want) but I think that some of the difficulty was just unfair, so I have increased fighter missile size by a 25% to make them a lot more visible and also based on feedback slowed the missiles by 20% so it's easier to react to a lot of them. 

The boss was even more difficult than the way to it so I have nerfed a few of the extra aspects of him. I've made it more rewarding to hit the weakpoint by 50% and nerfed every aspect of the turrets a small amount to make them less punishing. I will be speeding it back up for hardmode though as it felt about right for forcing players to make sure they are moving around properly. 

The last point about the boss is that everyone barely noticed the healthbar, I thought I could get away with having the basic hp bar but it just didn't. In the current version of the game I have a new pipe away from the boss that fills up as the fight starts and every time the boss is hit it flashes, it is substantially more noticeable than the old version.

At this point I'm pretty much finished with this level in terms of normal mode, so I'm going to work in implementing some menu's then move onto creating easy and hard difficult. As mentioned before hardmode will be at night and the players vision will be a cone of light aiming towards their reticle.

As far as results go for this 3 week project I'm very happy with where it has got to, I had a few problems with assets or programming not working but that was down to me screwing up more than something breaking. At the moment it lacks user interface like pause menus and such but they wont take long to get in over the main project.


Zip file of the second set of feedback

Level Design Part 8 - Boss Model

Based on the original feedback I had a few goals on what to change in the boss. First is to make the weakpoint a more obvious part of his design. Next was to add more feedback to dealing damage, sounds etc.

The 1st problem with the testing version was that his weakpoint was very difficult to see, but i'm putting that down to him only splitting into 2 parts. In the final model I always planned for him to split into a lot of smaller parts that open up more. I've added the intro to the 3D viewer to show his face opening.

On the feedback side of things I have added a lot of new sounds to him based on how you hit him. A hit to the skull makes one of several ping sounds but hitting the brain makes a mix of squelches and vocal noises of pain. This really helps register that he is taking more damage from this attack.


Level Design Part 9 - Level Diorama Idea

This was originally made so that I had something more interesting to show on websites, but whilst making it I thought why not make it the levels icon on the level selection map. It's more intestesting than a picture and having locked levels be silhouetted versions of these dioramas could catch peoples interest.


Vehicle Design Approaches Part 11 - Enemy planes

Done with modelling and texturing the planes now, I created 3 variants of each one that are randomly chosen when the enemy spawns. I think it makes it more interesting than just having the same red plane go past 20 times.  I chose all the bright colours in the designs to purposefully make then contrast with the environment so it's hard to miss seeing one come into view.


Level Design Part 7 - Environment Assets P1

Now that I have had the game tested I was happy enough with it to move into making the thing look prettier. 

First off I wanted to make sure that I kept the style consistent between all assets. This is an important part of the art design in game because a lot of inconsistency in a chosen style can really throw the player off and break the feeling of the world.
'This assures consistency, looks like the same artist painted them and it looks professional - like you actually thought about what you were doing.'David Kessler 2016.

I created a smart material in substance that created the basis of my stylised look. I could then throw on any colours or textures underneath this to mask them in the same style. This made my workflow a lot faster than it would have been if I had manually created the stylised look for each asset and as previously stated stopped model style looking inconsistent. 


This is the set of modular rocks I created, however you will notice they look a little different in unreal 4. This is because I knew that these types of rocks have white lines across them but if I put it in each individual models texture these lines would scale with the size of the model, this would make a lot of inconsistency in the look of the rocks. 

To counteract this problem I created a material in unreal that masks out the white lines using world coordinates  then overlays them on to the rock model based on its location in the world. This made all the lines on the rocks be the same scale regardless of the size of the model and I think it really does blend the rocks together more, making each piece of the assets less obvious.


A bunch of the general assets and the boss battles platforms.


Arid plants.


References

"Artists Must Maintain Consistency In Their Work". David M. Kessler Fine Art. N.p., 2016. Web. 23 Oct. 2016.
Temba, Anton. "Keep Your Game Consistent At All Times.". Gamasutra.com. N.p., 2016. Web. 22 Oct. 2016.


Tuesday 25 October 2016

Vehicle Design Approaches Part 10 - Character Feedback

So the model for the main characters been on sketchfab for a week now and it's been getting a fantastic reception from the sketchfab community and even got a feature in the official Sketchfab spotlight thread on polycount:  polycount.com/discussion/178637/sketchfab-spotlight-october-2016

Clearly this means I must have done something right with the design which is good news!

Haven't posted in a few days since I've been working like mad on getting assets created and polished. I'll do a big update tomorrow to show the transformation from a prototype to a hopefully finished stage in a game. 

Thursday 20 October 2016

Level Design Part 6 - Feedback and Lives

Yesterday I had a few people test the game in the lesson and the feedback I got was very positive. Everyone thought the sound cues for the boss worked well ''The sound and music to me was on point with the boss itself.'' (From Feedback)

There was a few things I missed though that I have now added into the game. Firstly left handed controls didn't even come into my mind originally but seeing a player having to use awkward movements to hit all the keys made it a necessity. 

Next whilst watching I noticed a lot of the time players were getting hit (before the boss) frequently at 2 different situations; Long falling time with little air control so they can't avoid bullets and the basic planes that shoot a bullet targeted at the players location. I've solved the falling one by adding some linear forces to push the player down after a jump (Changing gravity wasn't an option because it wasn't using character movement inputs). For the second problem I have replaced all targeted planes with standard ones for this early level. I think because of the number of objects on the screen later in the level it made players stop noticing bullets coming from planes that had went past their current focus point, which is fine for standard planes but the targeted bullets can be fired out of the players focus so they can sneak up before they are noticed.

Finally onto the boss battle reactions. Everyone got to the boss on the 1st run through of the level, which is ideal since dying without ever getting to the main event on a first level doesn't give you the 'I wanna fight that again' feeling. However everyone got to the boss with 1 or 2 lives left, so on top of removing the main problems that were damaging players (Without them being able to react). I'm going to be adding a Repair Station before the boss that will hand out a few extra lives, for now it gives them for free but I might make the players use currency found in the level to pay for extra lives so it adds a little risk reward factor.

An extra note on the boss, one player had difficulty reading the weakspot. At the moment I'm putting this down to the dummy model hiding a lot of the weakspot, so in the final model I'll have it open more and a set of unique hit sounds for hitting the it.

This is what I came up with as a repair shop. Spent from 11pm to 10 am doing the whole thing but it was worth it, I plan on having a few different jokey signs so its random which one is in the level. Can anyone think of funny names for the signs?


Currently looks a little odd in game since no other scenery assets have texture yet. 

https://drive.google.com/open?id=0B_G669l78r4YMHdRU1FncDVETVk
Zip file of the first set of feedback

Tuesday 18 October 2016

Level Design Part 5 - Particles and Changelog started


Today I've begun doing some more visual work, mainly particles effects at the moment. I got a bit carried away in the end and made 14 of them but at least that's particles I don't have to make later !


The fire is is the only one that's used in engine as a scenery piece, the rest are explosions and such so I'll show them off in the next video sometime this week.


Finally I have sketched up what I want the boss to actually look like based off the prototype I made. I'm really happy with the way this is going at the moment in terms of the design of the boss.


14 new particle effects:

Debris
Enemy Bullet Trail
Enemy Missile Trail (long)
Enemy Missile Trail (Short)
Player Bullet Trail
Player Bullet Explosion
Enemy Energy Explosion
Enemy Rocket Explosion
Fire
Fire (With wind)
Huge Laser Charge
Small Laser Charge
Smoke
Basic Trail (For prototypes)

UI:

New Aiming Redical


The Adjudicator:

Fixed several bugs where the main laser would fire twice or spawn in the wrong area

Sunday 16 October 2016

Level Design Part 4 - Prototype Boss in engine

So after I did the plan I went and rigged up the testing model so that I could start to program him in. Currently I have all the bosses fundamental attack patterns in and have each one of them introduced at a set time during the fight. I think that the boss works quite well but is lacking a few visual triggers for attacks (Laser charging etc) so I'm going to look into how to make some useful visual triggers using sound and particle effects.

Also if I can get it working on a university computer i'll see what some other people think of the fight.


This is the current Boss blueprint will all its basic code.

Level Design Part 3 - Prototype Boss Plan

A rough draft of how I want the boss to work in game. I've made the basic structure of the boss model then posed it in the 3 example poses for showing the bosses different stages. 

Wednesday 12 October 2016

Vehicle Design Approaches Part 9 - Ue4 Implementation

This is all the current blueprinting used in getting the main character to act and function. I have divided it into sets to make it easier to manage and plan out what I want. Since I set this up previous to creating the lowpoly of the character I created it so that old assets could easily be swapped for the new ones, without changing anything major in the blueprint.


This the characters material set up. In the past i've had problems with huge amounts of draw calls in scenes(This is caused by lots of different materials attached to objects in the scene), so I looked at ways to reduce the amount. I found UV offsetting to be an ideal way of doing this. The idea behind it is to offset the second texture set into the 1-2 space so that everything can be kept in one material. Also to help save on space the Metallic, Roughness and Alpha were merged into 1 image with each map taking up a different colour channel. This means I only need a single image instead of a separate one for each which would double the amount of textures in this material. 

The extra part on the left is a set of panners, masks and electrical textures. This is just a simple set of moving textures for the cannon to make it more interesting.


References

"Coordinates Expressions". Docs.unrealengine.com. N.p., 2016. Web. 12 Oct. 2016.
Quick Tip #25 : Fewer Draw Calls With UV Offsets. Youtube: Warren Marshall, 2016. video.

Vehicle Design Approaches Part 8 - Finished Main Character (Tank)


Finished the texturing and baking of the tank now. I think using the 5th colour scheme gives the tank a unique look. From the feedback received on sketchfab the design looks to work very well and people are liking it. 

I'm happy with this being the main colour scheme now and making new ones for it should be relatively simple with some texture swapping.

Now that the character is finished I've rigged parts and set up some apex clothing for the flags and underwear so they are not static in the game.


Vehicle Design Approaches Part 7 - Main Character Lowpoly

Since I was far into the design of the main character's tank and the overall design was working pretty well I decided to get it's game model all finished now so I still have the 2 and a half weeks to focus on the rest of the level. Doing this model early on also will make it easier when I want to add customization later on.

The first thing I decided to do was to break down the tank into individual parts with spacing in between, I can then have an easier time baking out maps without everything catching data from other assets.


Image 1 is the layout of all the parts in the model. If I didn't layout the whole set of parts I would have so many individual boxes to low poly and uv map. The 2 different colours distinguish the separate texture sets.


Image 2 is the uvs, showing an even spread of texture resolution over the whole model.

These are some comparison shots of the High poly, low poly and low poly with baked normals. It held all the detail pretty well I think.


Thursday 6 October 2016

Level Design Part 2 - Prototype Boss Plan

Scott rogers book Level Up has a great template I plan on using to base out this 1st boss. For this 1st boss I want to use all the mechanics the player has learnt during the course of the level in some way. This encourages players to learn how to use each element so more complex bosses can be introduced later.

(Just for reference bullets cannot be shot down but bombs can)

Boss Name: The adjudicator

Description: A giant AI skull integrated into the wall that blocks access to Concord City. It has several weapons at its disposal. It will animate in a very janky and robot way.

Required Animations:


  • Wake up (Intro)
  • Idle
  • Exposed Laser fire Upper
  • Exposed Laser fire Middle 
  • Exposed Laser fire Lower
  • Move rocket launchers into view for firing
  • Replace mounted turret
  • Death

Movement Patterns: 
  • Static location
  • Skull moves around to look at players location

Attack Descriptions:
  • Eyes charge up with a particle glow and then fire several bullets towards the players current location. This is the basic attack that happens whilst everything else is on cool-down
  • Every 10 seconds the skull will open exposing a main laser and the vulnerable brain, the head will then move to the height location the player is currently in (low, medium or high). After a 3 second charge it will fire a laser down the lane the player was in 3 seconds ago.
  • After 20 seconds a random turret will spawn at the top  rail (3 different variants) on death they award a chunk of damage and possible power up. 20 seconds after death they are replaced randomly.
  • Missiles will be fired into the air every 10-30 seconds. These missiles will then rain down on the playable area for the player to dodge or shoot.

Defeated by: Has a set amount of health the player must go through. Destroying the turret deals 5% health and hitting the brain does five times damage.

Damage Description: 
  • Attacking in general will do little damage but it can be defeated without hitting weak spots.
  • Hitting the brain is the key way of killing this boss.
  • Destroying the turrets is the alternate way of killing this boss.

Particle Effects:
  • Laser charge
  • Laser Fire
  • Missile Smoke
  • Death explosions
  • Brain juice impacts

Projectiles:
  • Red Bullet
  • Slow moving missles
  • Homing rockets
  • Giant Laser
  • Small Lasers

HUD Elements: Targeting reticle for eye lasers

Sound Effects:
  • Laugh
  • Laser effects
  • Missile explosions
  • Charging sounds
  • Mechanical 

Arena: The arena is mostly usable by the player with about 20% taken up by the boss. In the player area there will be sets of platforms that the player can jump onto to dodge the main lasers or hide underneath to hide from regular projectiles. Missiles will destroy parts of these platforms and if not shot down will eventually level all the platforms, making it much harder for the player to dodge everything.

Rewards: Unlocks access to the next level, gives the player a laser module for use at a later stage and awards a lot of scrap.

Fight Music: Remain - Ad Astra

Level Design Part 1 - Prototype Beat Chart

I've looked into how to plan out an effective way to create a map of what needs to be accomplished in each level and work out the gameplay progression. I found something called a Beat Chart, these charts are planned out in a way that explains the entire goal of a level. I'm going to test this method for the 3 week prototype so I can get the baseline for the goals of the level. 

Scott rogers book 'Level up' has a nice example to show how to structure the Beat Chart, so i'm going to emulate this to a degree for this 1st level. Another more indepth chart is the one used on gamasutra's website, this one has a nice way of structuring a level that has several goals. The gamasutra one might be ideal later on but for now I only plan on having a single goal for the level.

Level: 1-1

Name: Concord City Outskirts

Story: Lily MacKenzie and crew (Main character placeholder name) arrive at the boarder of concord city. They need to get inside the city to obtain a piece prototype equipment (This enables player customisation later on). When they arrive they learn that the city is surrounded by a huge wall and then need to get closer to investigate the path inside. Atlas are on alert and send out forces to stop the player in their tracks. 

Progression: 
  • Player taught basic movement and combat through use of in-world UI
  • Player is introduced to the idea of scrap as currency (for use later on)


Est.Play time: 6 mins runtime + 2-4 min boss battle (Depends on player skill)

Colour map: Browns (Desert and rocks) Reds and washed out other colours (Billboards) Blue (Distant Objects)

Enemies: 
  • Basic Fighter 1 (3 Bombs in a series) 
  • Basic Fighter 2 (3 Bombs fired at players location (No Homing) 
  • Basic Bomber (2 series of 5 bombs in quick succession) 
  • Bunker turrets (Rapid fire and basic)
  • Wall Boss


Mechanics: 
  • Teaching that bombs can be shot down but red bullets cannot and must be avoided.
  • Use of jumping to avoid obstacles
  • Use everything taught over the level in the bosses mechanics
  • Introduce temporary power ups (Lasts a single level)


Hazards:
  • Avoidable lines of fire 


Powerups:
  • Increased fire speed
  • Increased shot amount
  • Special shot - Homing Rockets


Abilities: No abilities yet (will be unlocked with customisation)

Bonus material: Concept Art unlocked?

Music Track: Remain - Acoustic Unleashed

Alternate versions:
  • Night time (less visibility for players and player has vision cone of light) 


I've added the extra set at the bottom because I think having ways to change a level to change the difficulty is an easy way to increase the amount of content that player has to play with. I decided to leave out adding abilities at this stage because I don't want to overload the player with tonnes of buttons and mechanics this early on. Once the player has the ability to modify their starting equipment I will be adding abilities.

References

"Beat-Chart � Game Designer's Best Friend". Gamasutra.com. N.p., 2016. Web. 6 Oct. 2016.
"Beat-Chart – The Best Friend Of The Game Designer — IT Daily Blog, News, Magazine, Technologies". Developers-club.com. N.p., 2016. Web. 6 Oct. 2016.
Rogers, Scott. Level Up!. Hoboken: Wiley, 2014. Print.

Vehicle Design Approaches Part 6 - Main Character Paint Jobs


Since I'm wanting to do a full level in the next 3 weeks it's a good excuse to get the main characters tank through the pipeline so it's base version is all finished early on. 

Done a set of 5 paint jobs/patterns. I'm liking 5 the most because the graffiti was fun to do and adds a lot of unique details around the tank. 2 is my second favourite but it might be a bit too saturated the rest are pretty standard.  

I'll hopefully be adding multiple paint jobs later on so I guess having some regular ones fills up the choices the player can choose from.

Wednesday 5 October 2016

Game Prototype Progress Part 1

Now that we are trying to do some part of the project in the next 3 weeks to see if we feel the project is going to work i'm going to try to get a prototype 1st level as polished as possible. Currently I have a level that's about 4 mins in length with 3 enemy types programmed in.


First off as with everything else I wanted how the player to move to have a lot of character behind it. I decided that it would be better to use physics movement for the player so I can cut down on animation and blueprint works. The first video shows the difference between basic character movement and using physics to drive it instead. I used the community based plugin for unreal 4 called Machinery Modelling Toolkit, this plugin made it quite painless to set up the physics (Had to change a few things to tune it what I needed).  It's pretty obvious which of the 2 looks visually more interesting.


This is the level I've created upto now. I've added a jump to the tank because one of the main problems I've had with design in similar games is that they have no vertical aspect to movement. Now that the player can jump I can add more interesting aspects to the level, like giving the player a choice between 2 paths.
This is a good base in my opinion for starting off the 3 week test because I can look at the good and bad points of the current version and research what and why the affect the game in that way.

Vehicle Design Approaches Part 5 - Enemy Kitbash Renders


These are all the enemies I created over the last week.


Pretty happy with how the basic bomber has turned out. I think having the 2 top and 1 bottom cockpit helps emphasis the scale of this aircraft. I might have a play around with giving it a more interesting tail though. 


The fighter is kinda boring now that I look back at it. I'm going to redesign it using the previous sketches to give it a better silhouette.


Not currently programmed in the helicopter, I'm loving the front and back views for it though. The curve of the body creates some nice shapes with the lighting.


 This is my favourite of the bunch. I'm going to use them as living landmines mostly, hence the antenna to warn players of their location. I've added some closed panels on the sides so I can maybe make variants of these that do different things.

Monday 3 October 2016

Vehicle Design Approaches Part 4 - Tank Renders


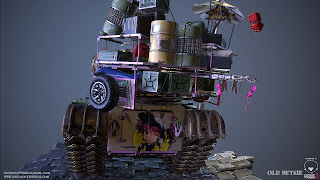
I took some better renders of the tank so it's easier to see whats going on in the design. I'm really enjoying this design at the moment but I think some of the clutter could use more detailed versions and some more variance just to make it that little bit more interesting.


Vehicle Design Approaches Part 3 - Characterization


Going off the previous research I've created a set of building blocks for bashing together models quickly for rapid 3D prototyping. I'm going to focus on the player characters tank for this initially because this is one of the most important vehicle in the game. 

Fig 1
Fig 1 is the model kit. For the modelling kit I decided to leave out basic body shapes because I think that would limit the creativity of the tanks right at the start of the design. 


Fig 2 - Attempt 1

These initial 2 designs are ok, they have a couple of basic identifiers on them like the hatches and main cannons. I feel that they are boring though as there's nothing really unique about them at all and they have no elements that would help characterize them.
Fig 3 - Attempt 2


I found a great piece of research in the Vertex 3 magazine in an article called ''Storytelling with vehicles'' - Matthias Develtere.

'Vehicles should tell stories as well, just like characters, weapons and environments do.' [Matthias Develtere 2015]

This quote is exactly what I want my vehicles to do. I don't want them to be the same old vehicles, I want each type to have a lot of story involved in its design. Matthias talks a lot about how using asymmetry in a design is an advantage because, the assets created can be used multiple times without looking all identical. This would be useful for things like ammo crates and small sets of repeating equipment. This will be a good way to add more clutter to a design without as much work.

For the third design I began using exaggeration on parts of the model to help give it some interesting features. The main exaggerations are making the body very stubby and also making the turret much thicker and shorter.

Once I had created the main body I looked into adding aspects to give it character. I wanted the tank to be something similar to the characters home, so I took some inspiration from pack mules and loaded tonnes of junk on and around the turret. I then focused the design down to a few major assets on the tank to explain the tastes of the characters and how they could use the space. For example next to the machine gun is an open case full of ice and drinks, once of which is open with a straw pointing towards the open hatch. On the other side there is also an old CRT TV and an old games system, these don't just show the characters have an interest in games but also gives some idea of things available in this time period.

I'm pretty happy with this being the main design for now whilst I prototype. I'll probably make a few changes before I create the final version for the game later on.